A lot of times there are always something going wrong with our computers, especially for MAC computer. If there is a problem with the Mac system then you will not be able to enter the system normally. If it is encountered such as system crash, malware or accidental deletion of the driver, which cause the system fails to enter system, then you will have to manually create a Mojave USB Installer to reinstall the system or repair the failure. So in the tool list of your Mac, there are few things more important than a macOS bootable USB installer.
In this article, we will show you how to create a bootable Mojave bootable USB installer on Windows with three tools: terminal, Unbeast and UltraDMG. Of course, there are many other methods to do the job. Here are just part of the more important of retrieval method. However, these methods have their own advantages and disadvantages, we cannot ignore them.
Part 1. What's Bootable USB Installer?
Mojave Bootable USB Installer: Also known as Emergency Startup Disk or System Installation Disk, It is a removable storage medium (U disk, CD, internal hard drive) with special functions that is written to the operating system image file, and is designed primarily to reinstall and repair the system when the operating system crashes. Mojave Bootable USB Installer is very important to all computer owners, it's just like a life-saving straw when your system crashes and fails to boot.
Part 2. Requirements
- 8 GB USB thumb drive
From your local supplies store or Amazon store get a USB drive that is above 8GB. Why above 8GB you may ask, If you must know, the MacOS Mojave installer is about 8.09GB, hence by logic you should get a larger capacity drive. Either you get an SSD, thumb drive or enternal hard drive C the key is to get the capacity right.
- Get MacOS Installation Files
Only download from the Apple App Store! We suggest you get DMG files only from Apple store, of course,you can also download the macOS mojave from the 3rd party site, but you should be aware of the fact that downloading from a 3rd party invites shady and malicious versions.
Launch your App Store then type "Mojave" in the search bar to see the link. Alternatively, you can click here for the link, to get the Mojave Store Webpage. On the page, locate and click 'View in the Mac App Store' button. Click the download button to start downloading the software. Mind you, if you have the installer already downloaded, you will see the 'Install' button instead of 'Get'.
Part 3. Ways to Create A MacOS Mojave Bootable USB Installer Drive
- Method 1. Using Terminal on Mac
It's quite challenging to create a such tool, but Mac comes with an excellent utility: Terminal, which gives users an additional choice to create a Mojave bootable USB disk. But notice that making a bootable MacOS Mojave USB installer drive will completely erase all data on your USB drive, this because USB's system format is totally different from MacOS, so it must be re-formatted to UEFI file format and repartition so that the DMG file can be written successfully!
Step 1. One the download is complete, you need to check if the "macOS Mojave installer file" is located in the /Applications directory, if not, then you have to move it to that directory!
Step 2. Connect your USB drive to the Mac computer and make sure if your USb is formatted to be Mac compatible. If not, then follow the step below to format your USB with Utilities.
1) Launch Disk Utility, located in Applications > Utilities
2) Locate the USB drive name from the left side of Disk Utility and click on it
3) Then navigate to the "Erase" tab and click it.
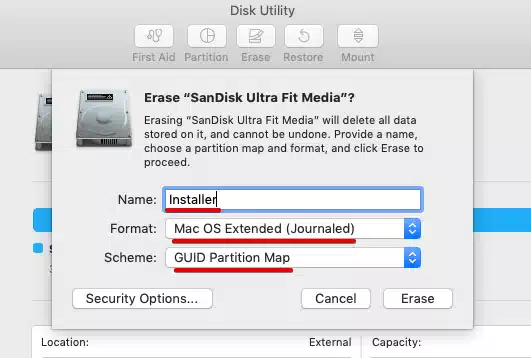
4) In the pop up Window, click the contextual menu and select "Mac OS Extended (Journaled)", then click "Eear" button to start to format USB.
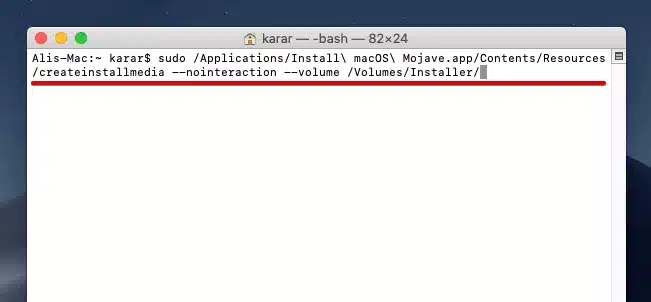
Step 3. On your Mac application list, click and launch the Terminal application in the /Applications/Utilities/ folder, then replace the "UNTITLED" with your USB dive's name by executing the following command.

Step 3. You will be asked to type the admin password. Once authenticated, the command will start erasing your USB disk. It will ask if you want to continue, type "Y" key and press Enter again to start to make a Mojave USB installer drive.
Ready to start.
To continue we need to erase the volume at /Volumes/install_build.
If you wish to continue type (Y) then press return: Y
Erasing disk: 0%... 10%... 20%... 30%... 100%
Copying to disk: 0%... 10%... 20%... 30%... 100%
Making disk bootable...
Copying boot files...
Install media now available at "/Volumes/Install macOS Mojave"
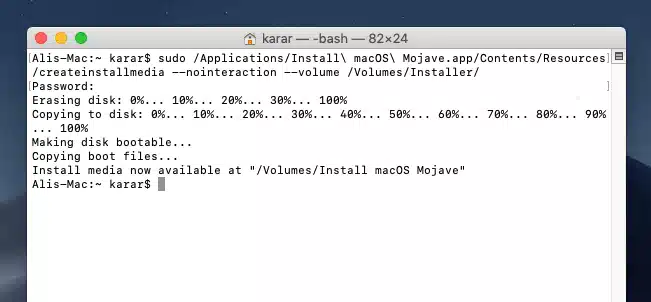
Step 4. After the formatting process is complete, all the files will be copied to your USB drive automatically. After a while, once the following messages appeared: Install media now available at "/Volumes/Install MacOS Mojave" on the command Window, it means your macOS Mojave bootable USB installer is complete successfully and it's ready to use.
Now you use this newly created Mojave USB installer to perform an update or clean installation on any Mac computers.
- Method 2. Create A MacOS Mojave Bootable USB using UltraDMG on Windows & Mac
However, if you're not very familiar with the command prompt, we will not suggest you try this method as it involves a certain amount of risk. Fortunately, UltraDMG exist already, it's a very simple tool that can be able to make a bootable USB drive from macOS you bought from Mac app store or the DMG file you downloaded from third-party site. The created USB installer not only can help you clean install Mac Mojave but also rescue disk for getting back your data from a crashed hard drive.
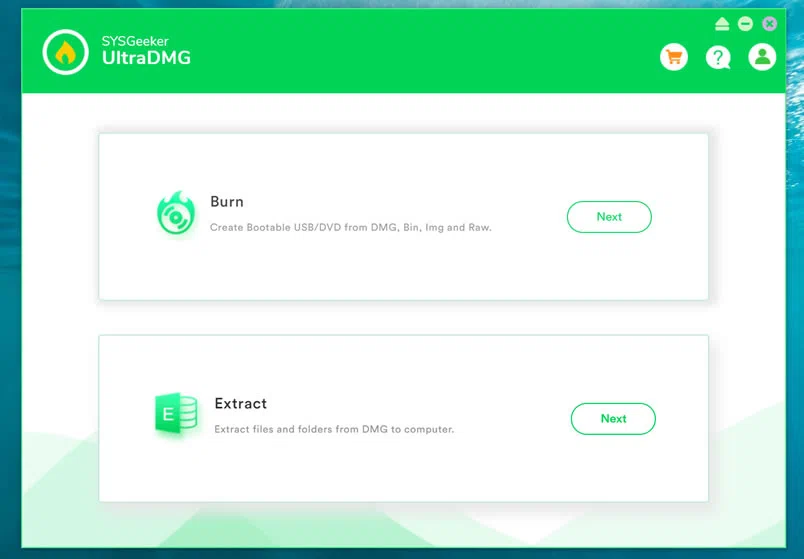
UltraDMG comes with two powerful features: Burn and Extract. The 'Burn' function enables you to burn a lot of image files including DMG, ISO, 7-zip, IMG, bin, bz2, gz, raw, sdcard, xz and more. And the 'Extract' function can let you extract everything from a DMG image file without error. The application works well on both Windows and Mac Platforms. It comes with modern UI and will create a mojave bootable USB drive with a couple of mouse clicks.
Step 1. If you can't enter your mac computer then you can download the Windows version of UltraDMG setup.exe on a Windows computer. Follow the prompts to install the software, then launch it! There are two options will be displayed on your screen, Burn and Extract. Now click "Burn" and it will take you to another window.
Step 3. Insert a USB drive or a DVD/CD disc to your Mac and the name of drive will be displayed. Then click "Browse" to add the .dmg file into the program.
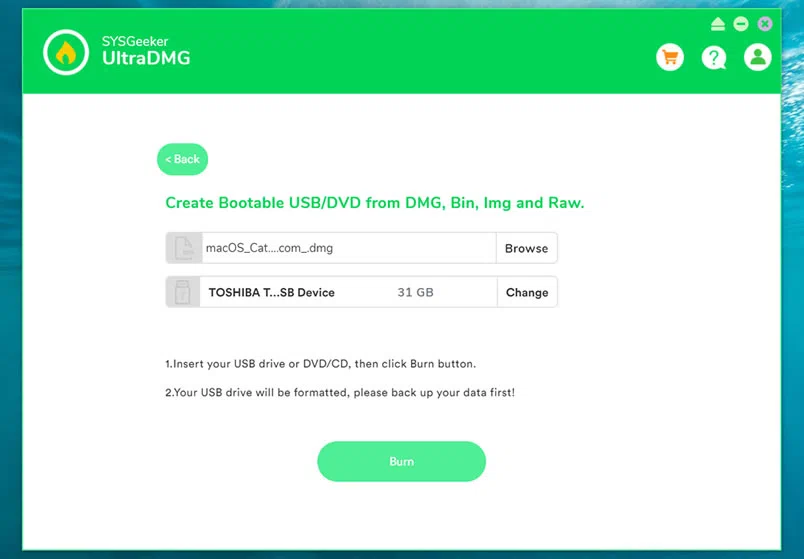
Step 4. After loading the dmg file from the local drive, click "Burn" to start burning DMG file to USB drive. In less than 10 minutes, the action will be completed. Wait a while before you do anything further.
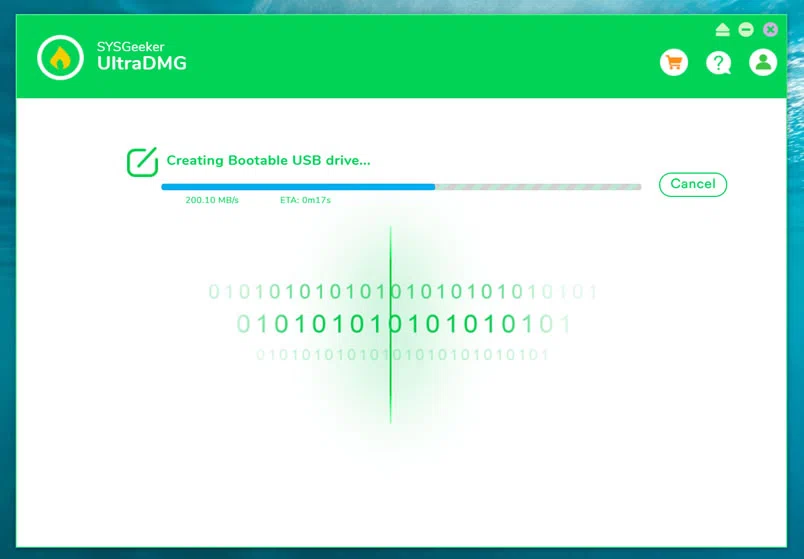
Don't disconnect your USB drive during the production process, otherwise it will damage your USB. When you see the interface below, it proves that you have successfully made a macOS USB drive.
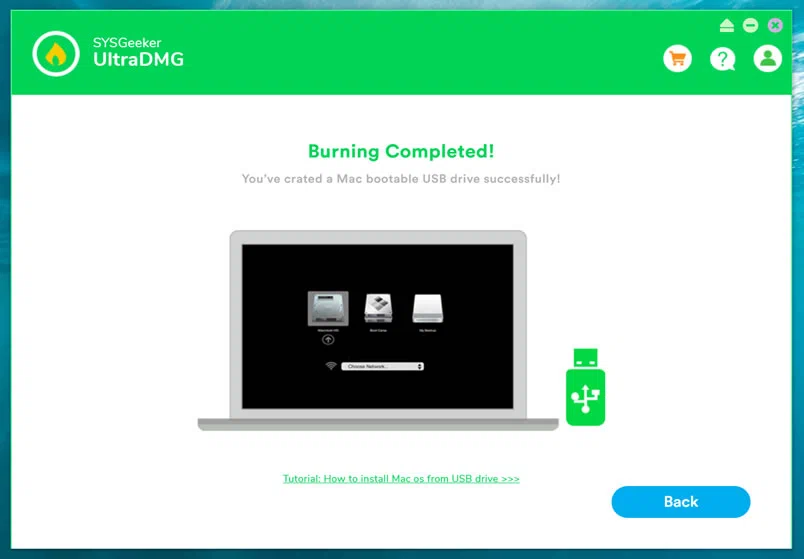
Congratulations! your job to create macOS Mojave bootable USB installer via UltraDMG is over. Now you can install Mojave typically as you'd do. As you can see, The process was simple and quick. Why not download it and give it a try?
- Method 3. Make A Bootable MacOS Mojave USB Installer with TransMac
TransMac has long been the default way to make a bootable USB for macOS mojave, it gives you abilities to copy, read, open and manage macOS's files and folders on Windows computer. As well as burn macOS files to disc for system installation. TransMac is not totally free,you can try it for free with 15 days before you need to purchase a license key. Let's see how it works.
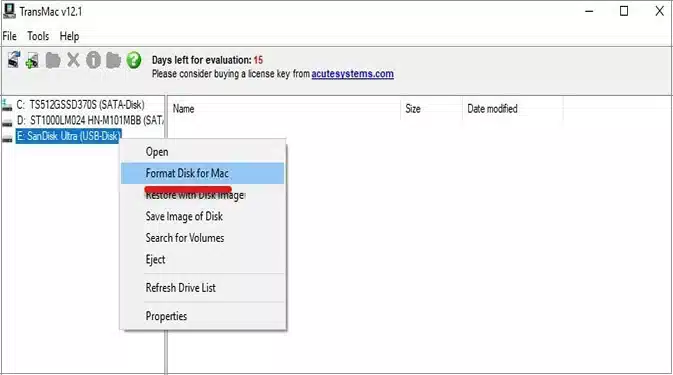
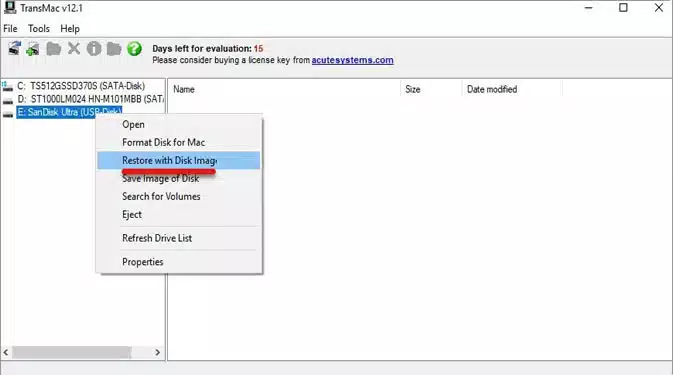
Step 1. After you download the tool on your Windows computer, install and launch it. Then plug your USB drive to the computer and the TransMac will identify it automatically, once the USB appears, right click on it and select "Format Disk For Mac".
Step 2. After formating your USB drive, right-click on the USB drive and select "Restore with Disk Image".
Step 3. After easing your USB drive, then click "Select file" button to load your macOS Mojave dmg file that you downloaded earlier.
Step 4. Now, sit back and wait for while as the burning process will take some times to complete, once the progress bar is done, your bootable USB of macOS Mojave is ready.
Step 5. You need to configure the Clover Bootloader so that your USB can be bootable on mac. However the Clover is already added in the DMG files of high sierra or higher version. But you still need to configure it according to system's configuration.
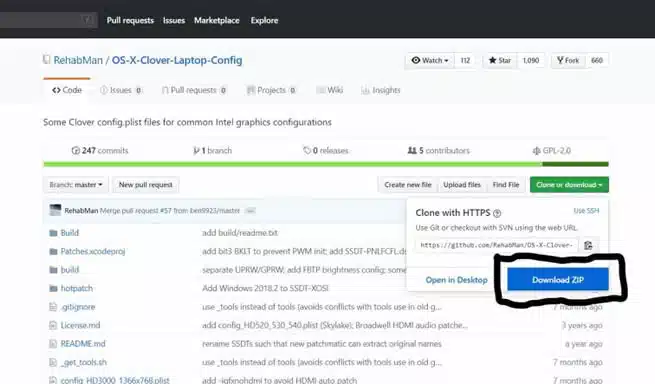
- 1) Download the clover configuration files from github site.
- 2) It's a Zip files, you need to unzip it first, then navigate to EFI/efi/clover/.
- 3) You need to delete the file config.plist.
- 4) Choose the file that contains your internal graphics card name. i.e: config_HD615_620_630_640_650.plist for Intel HD 630. After confirmed, just copy it into EFI/efi/clover folder and rename it as config.plist.
- Now the EFI drive is included in your USB drive and the configuration is complete
Now your bootable macOS mojave USB installer is ready and you can proceed towards installation steps. If Transmac doesn't working as expected then you can try alternatives to TransMac here.
Part 4. How to Install macOS Mojave from USB
To make your macOS Mojave boot from your created USB drive, you need to make some changes to your boot settings. You will have two ways to boot to your external USB drive..
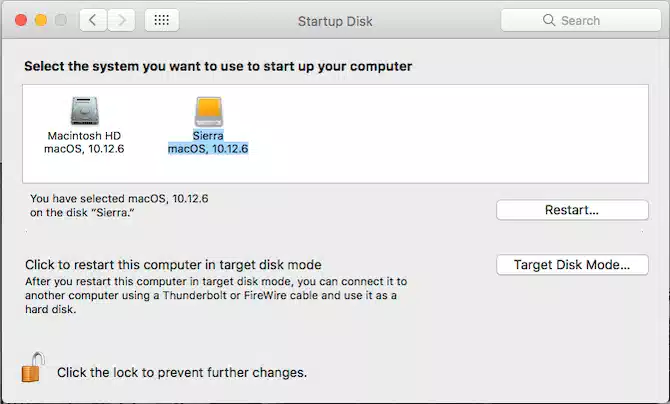
Option 1.
When you're already enter the macOS, go to System Preferences > Startup Disk. Then enter your admin password to change booting settings, in the new Window select your USB drive in the list and click "Restart" to reboot your Mac. Now, your Mac will restart from the USB drive instead of your hard drive.
Option 2.
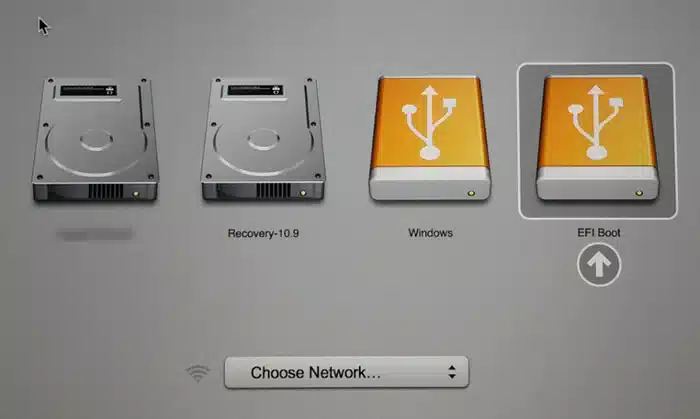
Step 1. Tunes on your Mac computer and press and hold the Option key on the keyboard when the computer starts.
Step 2. You will see your USB drive in the list of available drivers, and select your USB and hit Enter to continue.
Step 3. Then you can install the macOS mojave system from the MacOS utilities.
Step 1. Insert your a bootable drive to your mac cataina computer.
Step 2. Turn off your system and then turn it on again pressing the "Power" button.
Step 3. As soon as you hear the Windows start-up chime, press logn the "Option" button to get to the MacOS start-up manager page. You can now release the option key.
Step 4. Choose your USB drive from the page, and hit "Return" key. This will make the machine boot from the inserted USB drive.
Part 5. Comparison of Test Results
In our lab, our software testers have tested and evaluated these 3 methods mentioned above from the aspect of operability, success rate, usability, security,stability, and and finally we found that UltraDMG performed the best. Of course, you can download the software and try to create bootable macos mojave USB drive by yourself.
|
|
Terminal |
TransMac |
|
|---|---|---|---|
|
Support Image Type |
DMG, ISO, 7-zip, IMG, bin, bz2, gz, raw | DMG | DMG |
|
File Size |
67 MB | Built-in macOS | 2.1 MB |
|
Support Media |
USB, DVD/CD, SD,Blu-Ray | USB | USB/CD/DVD/Blu-Ray |
|
Platform |
Windows and macOS | macOS | Only Windows |
|
Difficulty |
Easy-to-use | Complex | Complex |
|
Success rate |
95% | 60% | 69% |
|
Cost |
$29.95 | Free | $59.95 (Too expensive) |
Conclusion
That' s all about it, Mojave is fairly similar to the previous versions of Mac OS, Now that you know how to create a bootable MacOS mojave USB Installer Drive on your Windows computer. This Mojave bootable USB installer enables you to easily format your Macs and perform a clean installation of your Mac OS Mojave without downloading installers or even as troubleshooting tools.
The three methods we observed above are practical, just select the one you are most comfortable with. In all the methods produce the same result. But If you're a new to computer then I would recommend you to select UltraDMG tool to do the job as it's really easy to use and high success rate, with it, everything is working great and as expected.